Tuesday 31 January 2017

"Truly, Madly, Deeply" - Maja Desgn - DT Creation - January


A very warm welcome to the wonderful Maja Designs blog. It feels like it has been forever since I was last here. Today my family and I are going to a engagement dinner for a lovely young couple who, we as a family have grown with over the past few years. It is ever so sweet to see these two uniting. So I thought I would create a simple but elegant card for them to help celebrate their unity as a couple. 
 This is titled
 “Truly, Madly, Deeply”


When I first had the idea , I knew I wanted to create something very elegant but not too vintage as they are only a very young couple. I also wanted to keep it clean and crisp and I think I kept to my plan pretty much.


I had used the Vintage Romance collection previously with another creation and I had a few scraps leftover which is what I have used for this card. They are as below. I only used the strip from the bottom of Champagne which says “Truly, Madly, Deeply”. I cut and distressed this piece and used this to run through the middle of my embellishments. I have used both sides of  Happily Ever After and torn and layered these papers to a baby blue cardstock card measuring 4 inches x 9 inches. My favourite size at this present time. I think this size cards keeps things elegant and stylish.

Champagne bs
Happily Ever After 
             
Happily Ever After bs


Love Notes
 and
Ephemera Notes
From the Ephemera Cards sheet I cut the doves and the hearts to help embellish my cards. I have also used the blue frame from Love Notes to sit under the doves and hearts as you can see below in the close-up photos.


I have used a beautiful motif that is an absolute favourite of mine. I have cut and extended this to fit under my ephemera. I have also added in a little cheesecloth along with some tiny blue roses and a couple of petals from a material flower.

I dusted over a little gesso to the flowers and other embellishments to keep it calming. Then a little Star Dust Stickles was wiped over areas included the hearts and doves of the ephemera piece. 


The card from another angle layered around some more gorgeous laces and motifs. This collection is a sure winner in my books. It is simply elegant! Well that is all from me today. I do hope that I have inspired you in some small way to create a little something for yourself or possibly a loved one.
A great excuse to create with Valentines Day only day away.
Until next time take care and happy crafting.

Tina xx


Monday 23 January 2017

"True Story" Dusty Attic Moodboard Interpretation for October

Hello and welcome!
Tina O with you today to, I hope inspire you to give this month's Dusty Attic Moodboard a go!
Have you seen it? Well if not here it is.......

So all you need to is to create a project that has some Dusty Attic chipboards goodies on it and upload it to the blog at the right side bar. There is a $100 voucher up for grabs. The first time I saw this board, the grey jumped out at me. I looooove grey, so that is what I went with. This is my interpretation of the October moodboard.

I have titled it ....
................True Story................


My starting point for this was my background page. I have used Maja's Nyhavn harborside collection for this. I tore the top section from the base paper and backed it behind with some of the yellow. I primed my page with clear gesso and then did some sentenciling with the Dusty Attic Distressed Diamonds Stencil and crackle paste. While it was still wet I sprinkled over some silver prills and then when it dried I coloured some sections with some Twinkling H2O's buttercup.


I layered some distressed lengths of this gorgeous lace I picked up at my fave shop, and coloured the flower centres with a little of the Dusty in Colour Cashmere acrylic paint.


The Dusty Attic Ornamental Trim #2 that I used here was cut up to elongate it around my rather large  flower cluster! I made up a mixture of Dusty in Colour Black Soot with Crackle Paste and some prills and Art Stones. I covered the whole piece and allowed it to dry. My foliage was dressed in the Cashmere. My foliage pieces were firstly crackled. Once they were properly dried I covered them in Liquid Pearls to take on the glamorous touch. While still leaving them rustic with the deep cracks from the crackle paste. The Bird Bath was only dressed in Crackle Paste. I did edge it with a little buttercup Liquid Pearls at the end.


Awwww and how cute is this Dusty Attic chipboard crown? I just had to use it here to make a statement about the photo. It was also dressed in a little liquid pearls.


And again closer.


This cluster got a little out of control but in the end I really loved the effect of all the layers. To help with the layering I have used some 49andMarket Rutic Blooms that I have coloured with black Distress Spray and then I edged the petals with a little dry brushing of gesso to help them stand out!


And these gorgeous Cameo Ribbons are just gorgeous. I have covered the edges with Silver Liquid Pearls and then added a Metal Clock to the centre. I used one Cameo Ribbon and cut it in half and added to the left and the right of the photo.


To create this project I have used the following products:


Well that is all I have for you today! I hope I have inspired you to give this months gorgeous moodboard a go. You have until the end of the month to upload your entry.

Until next time....happy scrapping.

Design Team Member 2016


Teen 
xOx

Tuesday 17 January 2017

"Merry Christmas" Maja Design DT Creation - "I Wish"

Hello and a warm welcome to you on the lead up to the big festive day. As this will be my last blog post until Christmas, I felt it only fitting to do a Christmas card .
So without further ado I present 

"Merry Christmas"


There will be a couple of my dearest closest friends having a giggle to themselves and one in particular maybe! She has for sometime now, been telling me to push the envelope and maybe do something a little out of my normal, so to speak. And for me that would be a card! Never in my wildest dreams would I have created a card, yet here I am!


I have kept this I think fairly simple adding in a little of me. Me being torn papers and those are of the gorgeous Maja Design "I Wish" collection. They are more than stunning and for this particular project I decided to stay with the vintage colours and style.


I have added in some beautiful and one of my all time favourite chipboard from Dusty Attic, the Baroque Corner. And also some Dusty Attic corrugated board to keep it a little rustic. The Baroque Corner piece was embossed and then sanded slightly to removed most all of the shine from the embossing powder.


And of course I added in some lace and twine along with some beautiful Poinsettias from Ultimate Crafts, large and smaller blooms I chose for this card.


And a little teastained muslin along with a dry brushing of gesso! I have a complete list of materials used for this little project below.

Maja Design - I wish  - Ephemera

Maja Design - I wish  - "Those memories will last" bs

Maja Design - I wish - "You a happy New Year" bs

Dusty Attic Baroque Corner Large


Dusty Attic Corrugated Board


Other Products Used
Lace
Ultimate Crafts Large "Seasons Greetings" Mixed Poinsettias ULT157663
Ultimate Crafts Large "Seasons Greetings" Small Mixed Poinsettias ULT157665
Miscellaneous Christmas Deco (White)
Liquitex Gesso (White)
Glimmermist Walnut Gold 
Stamp It - Superfine Detail Embossing Powder
Versa Mark Ink
Clear Seed Beads
Tea Stained Muslin
Sanding Block
Twine

Well that is all from me today.
I would like to thank you for visiting. 
I hope you and your family have a wonderful Christmas and a Happy and safe New Year.
Design Team Member 2016


"Escape" DA Project - January


Happy New Year and welcome. 

I am here with you today to share my very first Dusty Attic post for 2017. I am so very happy to be staying on with Dusty Attic for another year, so much more than you could know. For my first project this year I decided to do something a little masculine and to help me do this I have used this month's Dusty Attic  January Moodboard. It is up and yet again it is spectacular. You can see for yourself below.


And as always I started sifting through photos to find my inspiration. When I stumbled across this one I just had to use it. This photo of my hubby is very special to me and even more so because he does not feature in my layouts so often, due to the fact that when the camera comes out he seems to disappear rather quickly!!
My moodboard project has been titled 

"Escape"........


I so enjoyed creating this. And believe it or not, not once did I reach for a flower.......who would have thought! I have used a huge amount of chipboards on this layout and they have been used mostly around the base of the photo. The main chipboards used to create the platform for the photo was the Seagrass (large and small). They were all dressed with Crackle Paste and left to dry and crack. I then covered them with some Inka Gold Iceblue and Platinum. The photos really don't show the true outcome of the gorgeous sheen it produced. It also highlighted the cracks produced by the crackle paste really really well.


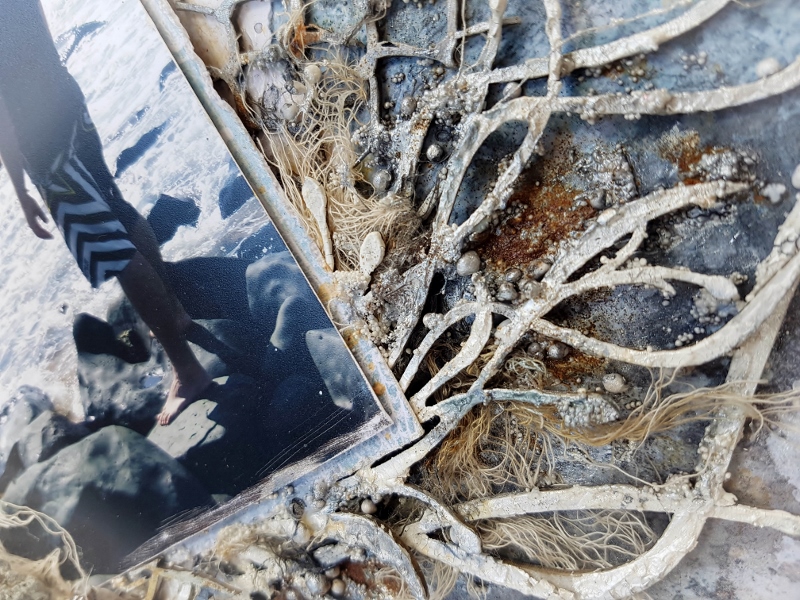
I have also used the large anchor as you can see above. Again I used Crackle Paste to firstly dress the piece and then I rubbed it over with Rusty Hinge Distress Ink and then I painted on some Tattered Angels GlitterGlam (Grand Tetons).  I randomly dabbed over some Dusty Attic Crackle Varnish to highlight sections of the Anchor. You can also see above the Fishnet Panel which I ripped apart into several pieces. They were all primed with Gesso and coloured with Grand Tetons GlimmerGlam and Walnut Stain Distress Ink.


And the same from another view. You can also see here the chippie word Escape.....love this font.....really gorgeous piece. I simply dressed it with Liquid Pearls.


So this is where I had my real fun. I used my Dusty Attic Rusting Powder which I would be so lost without when creating rustic projects. The Ships Wheel below and the flourish above were dressed in this. When I used the rusting powder I only sprinkled it over wet gesso randomly. I let it dry for a few minutes and then sprayed each piece with a little vinegar. I find you should not over wet the chipboard as the reaction time can take a lot longer. Once it started drying I used my finger to spread the powder and the colour a little. When it was totally dry I wiped over some liquid pearls to add a hint of darkness to it each piece. I then decided that this looked so cool that I went back and added rusting powder to the fishnet panel and the background page which I have never done before but the outcome, well I love how it turned out. If you have never tried the rusting powder you should give it a go!! I would be ever so lost without it!


You will also see that I added in some Prima Art Stones (Small and Large). They were coloured with the Glimmer Glam to make them shiny so they didn't get too lost in the background. 


And from another view. Here you can see where I added in the rusting powder to the background page. It really helps the photo pop off the page a little more. And for good measure I teastained some muslin and added in ripped sections.


 For your convenience I have added in a complete materials list below. For specific Dusty Attic products just click on the link below each photo and it will take you straight to the page. 

Materials Used 


Dusty Attic Flourish #7 DA0416 x 1
Dusty Attic Seagrass Large DA1103
Dusty Attic Seagrass Small DA1104 x 2
Dusty Attic Ships Wheel Medium DA1679
Dusty Attic Word Pack #10 "Escape" DA1266
Dusty Attic Anchors (Large) DA 0558
Dusty Attic Fish Net Panel DA0654
Dusty Attic Rusting Powder DA0995
Vinegar (Spray Bottle)
Blue Fern Studios Seaside Cottage "Embark"
Blue Fern Studios Seaside Cottage "Mermaid"
Liquid Pearls Onyx Pearl
Distress Ink Black Soot
Distress Ink Rusty Hinge
Distress Ink Weathered Wood
Prima Marketing Color Bloom Chrome Spray Mist
Art Basics Heavy Gesso
Art Basics 3D Gloss Gel Transparent
Art Extravagance Art Stones White Large #963705
Art Extravagance Art Stones White Small #963712
Art Extravagance Texture Paste White Crackle
Liquitex Clear Gesso
Liquitex Black Gesso
Tattered Angels Glam Glitter Paint Grand Tetons
Cheesecloth
Shells

Well that is all from me today. I do hope I have inspired you in some small way today, to give this months Dusty Attic Moodboard a go. All you need do is create a project using some or all of the moodboard components and a little or a lot of  Dusty Attic chipboard products and upload it to the right side of the blog......It's that easy!! You could win a Dusty Attic voucher for $100.00.


Thank you for taking the time to pop in and see my project today.
Until next time. xxx


Special Guest

Special Guest
2017